Chassis layout update
Because of the gear reduction unit, the battery tray is no longer usable since the back of the motor steps in: we'll have to think about relocating the battery inside the chassis.
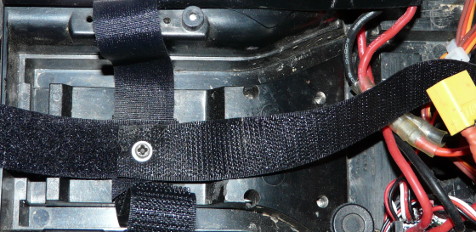
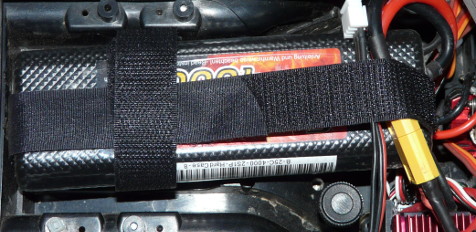
First photo: the rear bed is where I chose to relocate the battery. Another possible location is at the front of the chassis, on top of the main gearbox. I didn't choose the last solution because I didn't like it: sorry, I just can't say either why I preferred the rear bed or disliked the front option. It happens ![]() .
.
To secure the battery, I used velcro bands placed in the shape of a cross with a unique fixation point. This is what you can see on the second photo: right in front of the battery, you can see the motor endbell. At the lower right corner of this photo, you can see the ESC heat spreader and a hand screw I placed there to keep the battery off the heat from the ESC.
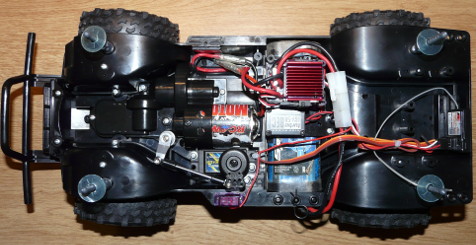
Now let's have a chassis overview:
"LandFreeder era" chassis
"Pajero era" chassis
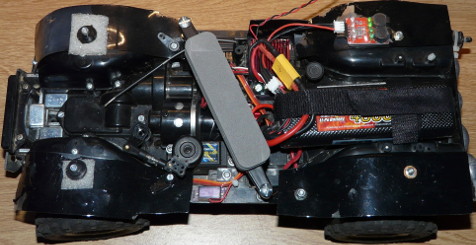
In addition to the gear reduction unit and the new battery location, several other mods can be seen. From the most visible, the LiPo battery and the low voltage alarm. You can also see ballast at the front and the rear of the chassis, and extensions on the wheel arches. Not to mention a strange bar crossing the chassis.
That strange bar is something to hold the interior of the bodyshell that you saw earlier in the article. As you could see, the interior is mainly made out of a long styrene plate: the bar located across the chassis holds it so it doesn't bend under its own weight. This bar was made with elements found in my "miscellaneous box": two long screws using existing holes of the chassis, a battery plate coming from a TB-03 chassis and foam bands from rally cockpits.
Other mods:
Mud protections
Front ballast
Rear ballast
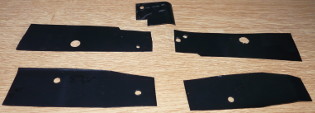
After 2 or 3 runs, that is about as many hours spent cleaning the chassis, I decided to install mud protections. The parts shown on the first photo were cut in lexan leftovers then painted black before being fitted as wheel arches extensions. Alright, you definitely can find better and more proper means to do this : these were a first try. I will probably rework them later: in the meantime, they do the job.
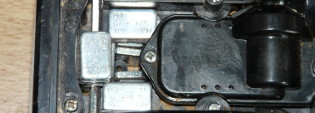
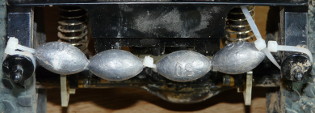
The next two photos show the front and rear ballast I added. Here, the goal is exclusively realism without any consideration for performance: in fact, I was not satisfied by the realism (again, not the performance) of my chassis suspension. Despite using the softest oil I found and many tests with different pre-load spacers (at the front only), the suspension looked too hard to be scale realistic.
To solve this purely aesthetic problem, I first added ballast to the rear of the chassis in order to lower the ground clearance "at rest". In fact, the GPM 4-link and damper mounts increase the rear ground clearance and the rear suspension travel. Aesthetically, the rear wheels get quite further from the wheel arches than normal. Thus the additional ballast to the rear of the chassis in order to lower it closer to a more natural and realistic ground clearance height. Only for information, 120g of fishing sinker are fixed in between the two rear body mounts. This value only corresponds the my specific chassis configuration (in particular the weight of my battery pack).
At the front, the problem was nearly the opposite: the dampers require several pre-load spacers in order to be able to lift up the front of the chassis after it compressed. However, this strong but required pre-load made the front suspension unrealistic since the car was pretty much bouncing instead of swallowing the uneven terrain. So I added ballast in order to force the dampers to work properly despite their strong pre-load. With 115g and the correct combo of pre-load spacers, the front dampers now work with realism.
Please note that the ballast weight values match my chassis in its current configuration. They will require new adjustments whenever I make further modifications and I highly doubt they would perfectly suit any other CC-01 chassis.
Other chassis modifications
During my several trailing sessions with the LandFreeder at first, then with the Mitsubishi Pajero, I added several elements to my chassis to improve its clearing abilities, or better said, to clear some obstacles more comfortably. I also noticed issues I had to solve.
First, the front bumper. Already at the time of the LandFreeder, I had removed the front bumper, both because it was unrealistic and because it was sometimes a worry at the time of clearing obstacles. However, without front bumper, the famous squared "front brick" was then turning into a stopper when clearing obstacles. One frequent solution is to remove that front brick by dremeling the chassis: even if I won't deny the benefit of this removal, I am not ready to do this to my chassis.
So I used another solution to reduce the "brick effect":
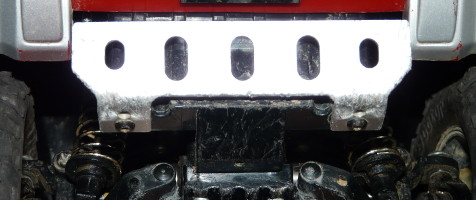
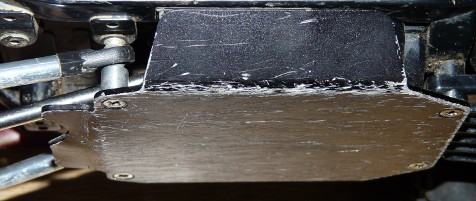
This front bumper is a skid plate, this one being made by Junfac: its main role is to cut the angle of the chassis brick, allowing the front of the chassis to slide onto an obstacle. On the second photo, another Junfac option, again a skid plate. Same role, but this time to allow the chassis center to slide onto obstacles instead of having the 4-link anchors bumping into obstacles.
By the way, this chassis skid plate has another benefit: it protects the main driveshaft at the exit of the main gearbox, which is a highly exposed location when clearing obstacles. However, it also has two drawbacks: the first is to reduce the ground clearance at the chassis center. The second is that Junfac designed it for the long wheelbase chassis and/or for the stock chassis using the stock plastic rear axle links. The increased rear suspension travel due to the 4-link makes the driveshaft go lower than stock when the rear drivetrain is in full suspension stroke. In fact, the driveshaft hits the Junfac chassis skid plate, so you need to rework the skid plate a little bit to make it "more flat" on its rear side: just slightly bend the rear metal side of the skid plate so it is more flat, allowing the driveshaft to clear it.
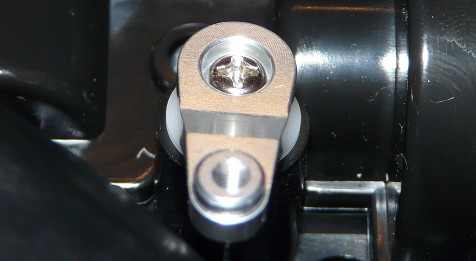
Last, the steering system is, by far, what caused me the biggest problems. Here is the GPM aluminum steering system as I initially installed it into my chassis:
Upper part
Rear part
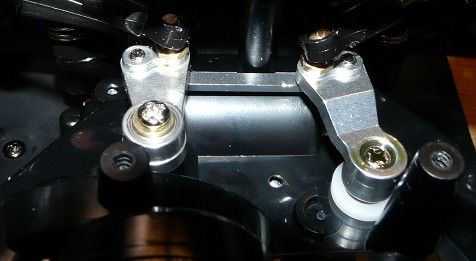
At use, that is after 2 or 3 runs only, the GPM steering system revealed how bad it is: the aluminum used to make it is to soft that a considerable play shows up in the steering. To make it short, the GPM sterring system is well designed, but made out of a material that is not suited to its usage. Internet is full of negative comments about it, and about as much tentatives to solve a problem the manufacturer can't ignore. But so far, GPM doesn't seem to bother. Conclusion: don't make the mistake of buying this crap.
To replace it, I fitted the stock steering system: with time, it seems that play also shows up, but not as fast nor as much than the crappy GPM unit. I am still thinking about something to improve the steering, but so far, I couldn't find a nice solution. I will probably update this in a near future.
Trailing expeditions with my Mitsubishi Pajero Metaltop Wide
The greatest thing with a trailing model is that you can either join friends for a trek or charge one battery and go for a walk by your own. No need to carry several batteries: one is more than enough for over one hour walk. Well, first test your model autonomy since you will not appreciate to carry it all way back. Don't forget your camera, or even better your camcorder: you will use them.
So here are a few photos of my Mitsubishi Pajero Metaltop Wide during the 2nd Rando des Corbeaux (Crow Trek) organized by the club in september 2014 :
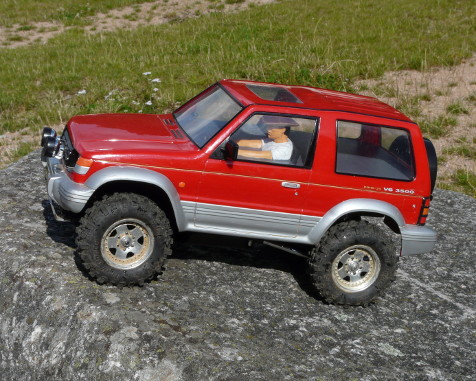
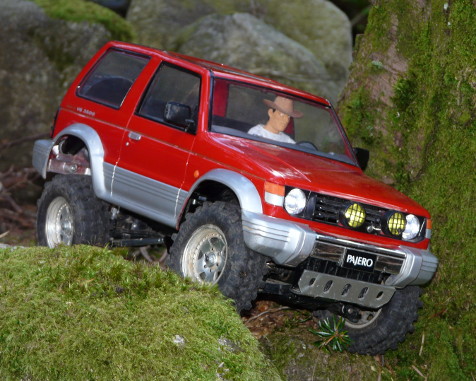
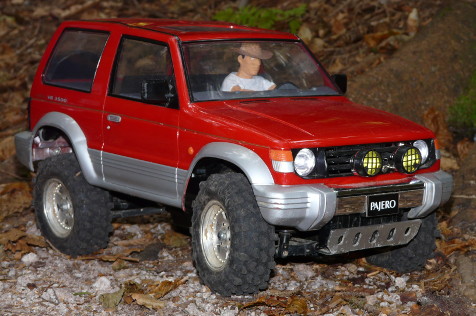
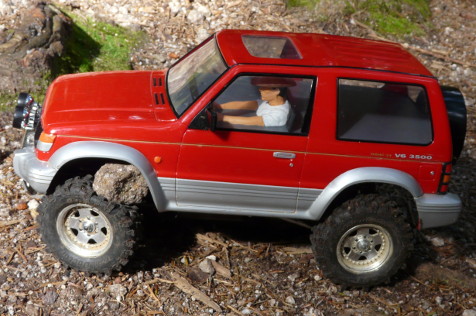
Let's begin with the last photo, because it is fun: several times, big rocks managed to get in between the front tire and the wheel arch, making my model stop immediately. So here's the ultimate proof that you can trust the SDI tires: they do provide a fantastic grip ![]() . The first photo is a quiet pause on a rock before the trek. The second one shows the maximum rear suspension travel and the third one shows my model in a more realistic manner. This is precisely this aspect that I wanted to tell you more about.
. The first photo is a quiet pause on a rock before the trek. The second one shows the maximum rear suspension travel and the third one shows my model in a more realistic manner. This is precisely this aspect that I wanted to tell you more about.
In my opinion, you can not achieve the maximum scale realism and the greatest clearing capacity at the same time with the CC-01 chassis: you have to find a compromise, in particular by setting a greater than normal suspension travel on the rear drivetrain. At least greater than the real 1:1 car. For me, the result seen of these photos is fine. In addition, always keep in mind that the CC-01 is a deliberate choice for scale realism over clearing capacities. Compared to chassis like the Tamiya CR-01 (which is more a crawler) or Axial SCX10 (today's reference of scale chassis), the CC-01 is much smaller and more limited at the time of clearing obstacles, even if its abilities are quite surprising considering its size.
To demonstrate what I just said, here's the model line-up at the 2014 Rando des Corbeaux:

Alright, the arrow may be too much, but my Mitsubishi Pajero looked lost in the middle of a vast majority of Axial models (Yeti and many SCX10). One original Tamiya 3Speed Bruiser (modified) is hidden in fifth position from the right, and one modern Tamiya 3Speed (modified too) is at the far right of the photo. Obviously, the CC-01 chassis clearing abilities can't compare with these models, just considering the size of the model. As for scale realism, the CC-01 is by far more realistic, but some bodyshells can make the Axial SCX10 very realistic too.
Anyway, my Mitsubishi Pajero Metaltop Wide, and more widely, any CC-01-based model runs in a very scale-realistic manner. But their clearing abilities are pretty good too:
A cheerful thank you to my friend Guillaume for the first video in slow motion, where there is a live demonstration of what the chassis skid plate is made for ![]() . The second part of the second video is a zone made for the 2014 Rando des Corbeaux: you can see how good the CC-01 is at clearing obstacles, but also that it cruelly lacks steering angle (aspect still to be improved on my chassis). The video also betrays my poor driving skills: as a matter of fact, you should not hit the zone markers (fault), so imagine my score after stepping them repeatedly or moving them. Add the number of reverse I made and the result was not the best of all: for me though, this was not important (well, better
. The second part of the second video is a zone made for the 2014 Rando des Corbeaux: you can see how good the CC-01 is at clearing obstacles, but also that it cruelly lacks steering angle (aspect still to be improved on my chassis). The video also betrays my poor driving skills: as a matter of fact, you should not hit the zone markers (fault), so imagine my score after stepping them repeatedly or moving them. Add the number of reverse I made and the result was not the best of all: for me though, this was not important (well, better ![]() ). However, I am quite proud that my model could clear the zone without rolling on its roof: the section between 1:45 and 1:55 made a lot of victims that day.
). However, I am quite proud that my model could clear the zone without rolling on its roof: the section between 1:45 and 1:55 made a lot of victims that day.
As a conclusion, the CC-01 is really very good at scale trailing once it is modified for that purpose. The most significant improvement is the gear reduction unit, then the adjustments on suspension and the very good tires. The steering, namely the steering angle, is yet to improve, but overall, I am very satisfied with my model.
Of course, a "stock" Axial SCX10 has much better clearing abilities and you can easily find better bodyshells and accessories to make it more scale realistic. But for a 20 year old chassis, the CC-01 still has impressive resources in scale realism and clearing abilities, in addition to be very awesome to watch moving around.
Related article


