
")
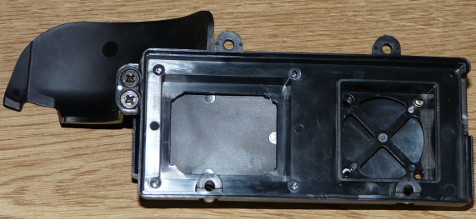
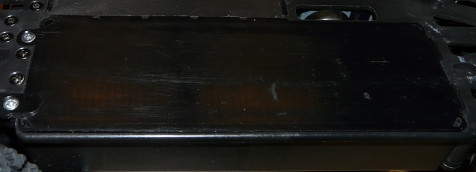
 The tray for electronics
On a chassis designed for rally, offering a tray protection for electronics is a great idea. In theory. In practice, electronics may become more difficult to install, unless you use traditional brushed motors with small size ESCs. As for brushless systems, especially the controller, it becomes trickier.
First of all, even though it may look like a detail: forget any ESC with integrated on/off switch. I've been that way, trust me  . Once the controller is enclosed into the tray, you can't use the switch anymore. So prefer controllers with a separate switch.
Second aspect to consider, size. Yes, size does matter because the tray dimensions severely restrict possibilities. Maximum available height is 35mm, but only under the aeration grille: it is limited to 20mm everywhere else. Maximum width is 40mm, but only 37mm if you want to clear the cover mount pillars. In concrete, every Tamiya TEU-101 to 105BK ESC will fit, as well as the TEU-302BK and the new brushed/brushless TBLE ESC series.
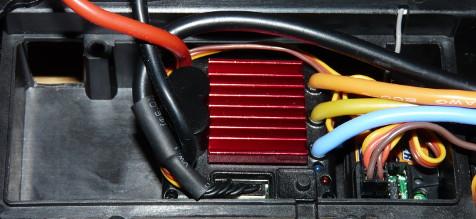
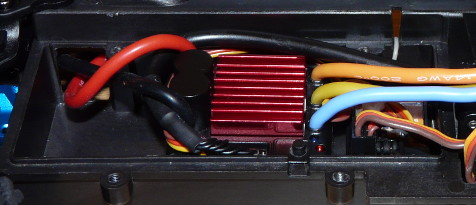
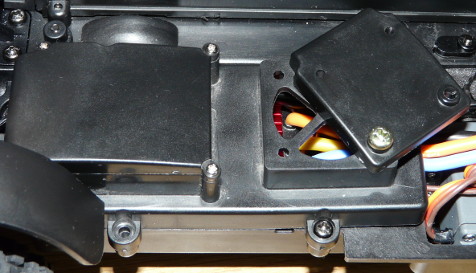
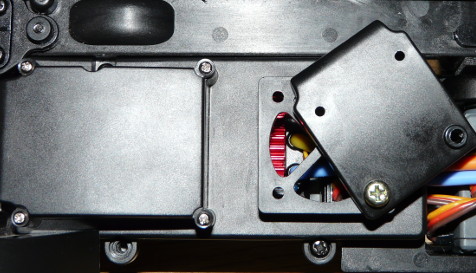
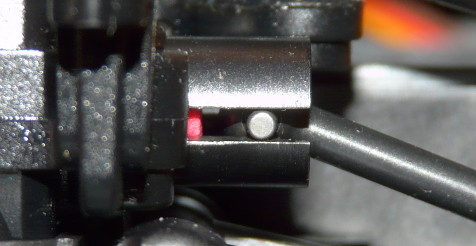
On the left, the inside of the tray for electronics: the X shape grille has been cut during one of my many attempts to fit my ESC. On the right, the definitive position for my ESC and receiver: you will notice the controller capacitors are precisely located right under one of the aeration grille because they are 26mm high, that is 6mm too high to fit anywhere else in the tray. You can also notice the square 40mm ESC is a very tight fit once you cleared the cover pillars. Last, that little round button on the right side of the ESC is the on/off switch: remember, that switch I recommended it shouldn't be integrated to the ESC? 
So now, first thing is to insert the ESC plug into the battery tray because you won't be able to reach it later if you leave it in the enclosed tray for electronics. Next, close the tray for electronics:
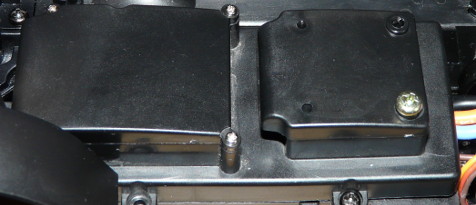
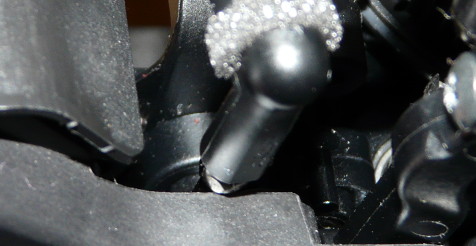
Great! Now the question is: how to reach the ESC switch that is now hidden in the closed tray? That was the moment when I needed an idea because I didn't take time to think about this before buying an ESC with an integrated switch:
The solution I came up with is to use a 4mm screw that will allow to pivot the cover above the switch. Normally, this cover should be fixed from the inside because Tamiya didn't design this side of the tray to be opened from the outside. Actually, the other side of the tray allows an access from the outside, even though the 4 little screws mean it wasn't designed to be used on a regular basis. Anyway, I managed to place electronics both with components size and switch access considerations, but it meant to make things quite differently from what Tamiya designed.
Nevertheless, despite not being perfect, this solution works. As for waterproofing the tray for electronics, forget it: in stock form, this tray is not and was not designed to be waterproof because electronics need to dissipate heat out of the tray. The tray and covers were designed to protect electronics from direct projections and dust, not as a waterproof compartment.
The battery tray
Here is another specific aspect of the XV-01 chassis that you may have already spotted from the previous series of photos: because the electronics are placed inside a dedicated tray, the battery pack and the ESC plugs must be located into the battery tray. Which makes things more complex, even though Tamiya designed things in consequence:
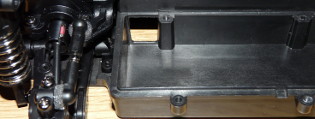
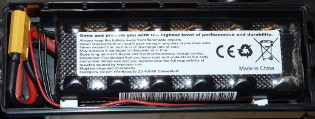
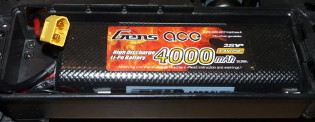
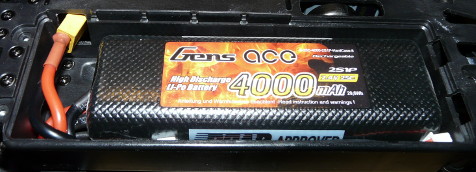
The ESC plug needs to go across this hole in the chassis in order to reach the battery tray where it will meet with the battery pack plug. On the next 2 photos, you can see different shape LiPo battery packs and plugs fitting in the tray. At first sight, there is room enough, but do not forget the plugs need to fit there too, as well as more or less extra wires from the ESC and/or the battery pack.
On the second photo, the ESC plug is a 4mm HXT: it can clear the hole from the tray of electronics to the battery tray, but once the battery pack is plugged, there is no much room left for anything elss in the tray. You can also see a Tamiya plug: no problem there, either for the plug to clear the hole or once the battery pack is plugged. However, the last photo shows the XT60 plug I now use on most of my models: it is actually too big to clear the hole between the trays. Solution: a small cut to make the hole a little bit bigger so the plug can clear it.
Installing a battery pack
I admit this is a very basic operation you did not expect, but trust me, it deserves it with the XV-01 chassis.
First, please note the ESC plug has already reached the battery tray: if you forgot to pass it through, you can now flip the chassis back, re-open the electronics tray, make the plug pass through, close the electronics tray and come back here. The tape band you can see here on the first photo is meant to maintain the antenna wire into a groove so you can manipulate the battery pack with no risk to damage the antenna wire. Now, you can place the battery pack into the tray and plug it:
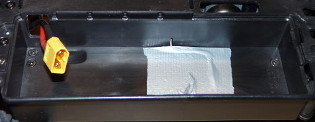
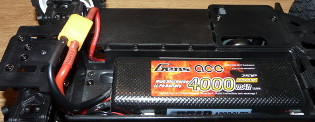
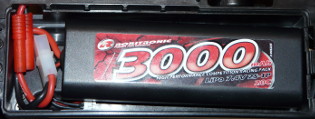
Despite the available room in the battery tray, you will have to find more room to fit the extra length of wires without stressing the plugs. For this, you may find useful to partially push back the plugs in the tray for electronics to gain some room. Then you can close the battery tray door, taking care not to pinch any wire (especially the balance wires when using LiPo or LiFe batteries):
It is not that complicated, but you'll have to admit it is not the most straight forward manner Tamiya has ever designed. Also, you may notice the grooves Tamiya made in the battery tray bottom for L-shape battery connectors (have a closer look at the right of the XT-60 plug on the first photo in the above series).
Overall, Tamiya made efforts to take into consideration the modern rectangular-shape battery packs, not forgetting the compatibility with traditional oval shape battery packs.
The XV-01 chassis ride height
Usually, on-road chassis are setup with hard suspension and a low ride height in order to lower the center of gravity (which reduces the chassis roll in corners). As a matter of fact, for on-road chassis, the dampers rarely work on more than a 2 to 4mm travel when you drive them on the track. Which is logic: asphalt or carpet tracks are almost perfectly flat, so the damper work mainly focuses on absorbing the chassis movements.
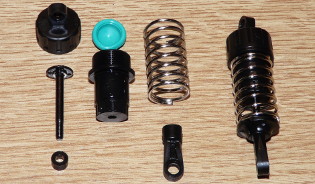
For rallying, it is quite the opposite: the ground is generally far from flat, so the suspension needs to be soft and to offer enough travel to absorb the rugged terrain. But this is a surprise: the dampers supplied with the XV-01 are the famous CVA in their 50476 Super Mini Shock Unit version, the shortest available from Tamiya (50mm long): yes, those recommended for M-Chassis! This choice may seem strange because you would naturally expect much longer dampers for a chassis designed for rallying. And yet, they will prove to perfectly suit.
Nothing specific about these dampers since you build them like any other CVA, except that they use the same oil as the differentials were filled with. Remember, this is one of the thickest oil available from Tamiya: coupled with the short dampers, you feel like setting up a chassis for a carpet run...
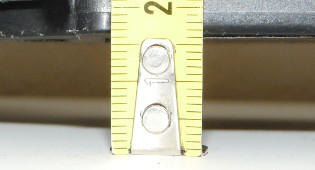
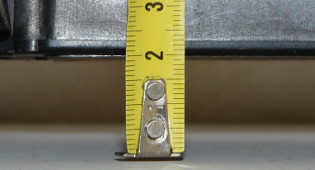
In fact, it is while you build the dampers that you will consider the chassis ride height. In stock form, when following the manual instructions at step 24 recommending to use the short V1 rod ends, the XV-01 chassis will get a 16mm ride height. In comparison, my TB-01 chassis is 17mm high. Obviously, you immediately think about using the longer V2 rod ends, increasing the ride height up to 22mm: easy!
Not such a good idea, after all: in this configuration, the first photo shows the steering rod hitting chassis reinforcements that you can't re-cut without seriously compromising the chassis strength. A the rear, the CVD driveshafts end get closer to the differential outdrive edge, but this is not a concern. However, install CVDs because the problem may become more critical when using the stock dogbones.
It is to be noticed that the steering jams only when the suspension is fully decompressed and wheels are fully turned: in real conditions, the problem occurs in fast or sharp corners when the inner wheel gets off-loaded due to chassis roll. So the problem will not occur very often, but when it does, it will seriously compromise your run.
Another trick could have been to reverse the ball ends location on the uprights: I tested this too. The result is far from convincing, both because the steering rods rub the chassis this time when suspension is compressed, and also because the whole geometry of the front drivetrain is altered. Not even mentioning the whole steering system gets fully exposed to direct projections of pebbles and debris from the front wheels.
So, to make it simple with photos, you have the choice between the solution “as per the manual” with a 16mm ride height, the “long rod ends” solution with the 22mm ride height and the steering jam problem... or a problem-free solution with a 22mm ride height .
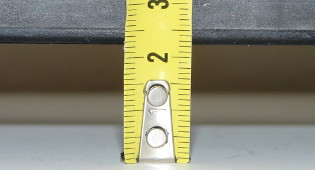
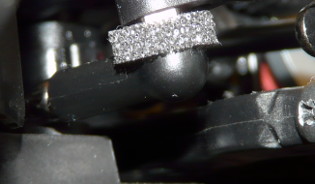
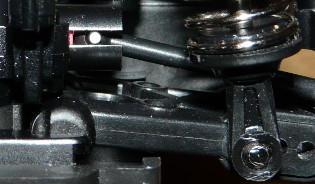
The “secret” to achieve a 19mm ride height on the XV-01 chassis can be spotted on the 4th photo: the V11 3mm spacer located on the kit damper sprue. Just place it on the piston inside the oil tank so the piston travel is reduced by 3mm. Then replace the stock 13mm rod end with a 19mm long rod end and install the damper on the chassis: the ride height has been increased by 3mm compared to the stock build using the short rod end without spacer. The fifth photo shows the steering rod clearing the chassis and the last photo shows the driveshaft end in the differential outdrive (CVD).
To conclude, all this for 3 little millimeters . Not sure they will make a big difference when running, but they can't hurt. The direct replacement of the stock damper rod ends with longer ones is not recommended, and reversing the steering rod position on the upright is not recommended either to improve the ride height. Either you keep the stock build or you use the inner spacer + long rod ends to gain 3mm. Anyway, please note that the values are theoretical: here, we are talking about “off-load” values. To achieve them “full load”, that is when the model is ready to run with all equipment on board, you need to use spring spacers in order to set the dampers to their maximum travel length when the car is idle.


One last word about the suspension in itself: the #900 oil (before last on the above photos) is among the thickest, so you would guess dampers to be hard as iron. For your information, the most common yellow oil found in most Tamiya kits is #400 viscosity, the most fluid being the red #200. The thickest Tamiya oil is rated #1000 which is the viscosity of water. As for the springs, I found them to be “medium soft”, but this is a personal appreciation only since Tamiya never give any information about springs, unless for TRF units. Overall, the stock XV-01 dampers are smooth, but not too soft thanks to the oil viscosity. They will need testing at the track because I admit I was quite surprised of this setup for a rally-oriented chassis, and even more surprised to feel how smooth they are once installed on the chassis.
