
")
The TA-04 TRF chassis
The bodyshell I chose requires to widen the chassis from 190mm to 200mm. On the 1/10th RC market place, there are basically two available width standards: narrow (190mm) and wide width (200mm). This last one is mainly used by gas-powered models, the first one being mostly used in electric-powered models like almost every Tamiya on-road Touring car.
There are three ways to increase the chassis width:
- using thicker wheel hexes but then the wheel axle length will be too short
- using longer wheel axles like I did on the rear drivetrain of my M-02 Toyota Celica Gr5
- using rims with an offset
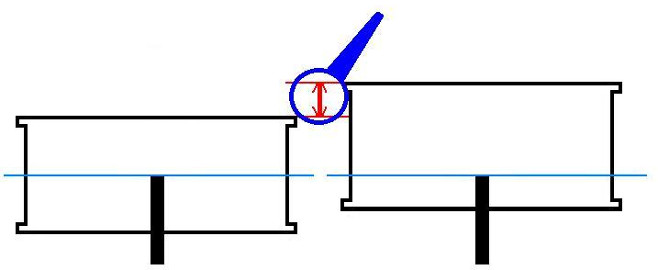
The last option is the one I chose for this project since it is the easiest. The rim offset is the distance between the centerline of the wheel and the plane of the hub-mounting surface of the wheel (Wikipedia). However, this mechanical definition doesn't exactly apply to the RC world in the exact same way. In our small world, it is not the centerline of the wheel that sets the 0 offset value but an other arbitrary value used as a standard by all manufacturers (by chance!). From this arbitrary value, the manufacturers set a rim offset: the offset is measured in millimeters, it is positive when the rim is shifted towards the outside of the chassis and it is negative in the opposite situation. Note a given rim offset can't be modified: it is part of the rim characteristics, like the diameter and width are too.
Mechanical definition of the offset
Applied to RC on a TA-04 chassis: 0 offset rim (width 185mm)

+3 offset (width 191mm)
+6 offset (width 197mm)
Out of the box, the TA-04 chassis comes with +2mm offset rims to be 189mm wide (rounded to 190mm to make it easier). Manufacturers often use the offset solution to shift the wheels as close as possible to the bodyshell wheel arches in order to give their models a more realistic look. On their on-road models, Tamiya mainly use 0 offset or +2mm offset rims: however, if HPI (and other manufacturers) always indicate their rims offset,Tamiya almost never does.
Negative offset rims also exist but they are very rare: their purpose is to reduce the chassis width by shifting the wheels towards the inside of the chassis. This solution is not much used since it has a major drawback: the uprights. Indeed, the uprights need to go further inside the rims without blocking them: very few transmission systems can allow this because the uprights need to have a thin and long profile in order for the rim to remain out of reach of the arms and other tie-rods that make the drivetrain geometry. Moreover, the uprights being stressed parts (especially for steering wheels), long and thin uprights would create a cantilever that would make them fragile.
Brake discs
On my chassis, I also added brake discs to make it look more realistic: they only have a decorative function and are placed between the rim and the upright. They do not create any additional offset since they only replace the wheel hex.
3Racing Realistic Brake Discs (reference 3RAC-AD12/V2/RE)
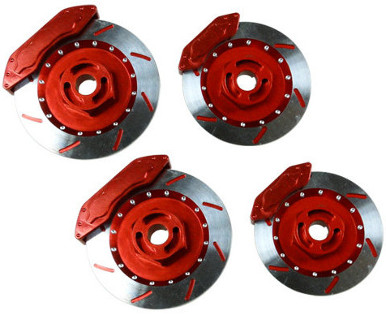
Video demonstration (© 3Racing)
This is the first time I hold a 3Racing part in my hands. First impression: top quality. The second impression comes after reading the manual and inspecting the parts: identifying 0.1 and 0.2mm spacers won't be easy since they are all mixed up in the same bag. The good news is that all the required ball bearings are provided. Beware though: you do need the 3RAC-AD12/V2E spacers if the uprights are shaped to fit 1150 bearings (like on a TA-04). The last impression comes when assembling all together: you need high level dexterity in order to insert the hex shaft in between the 1mm space left between the disk and the calliper. After a few hours to mount them (did I mention how difficult it is to assemble this?):
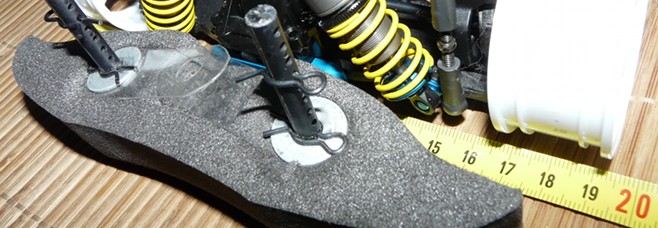
Parts required

Result at the front
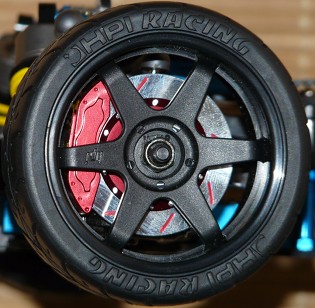
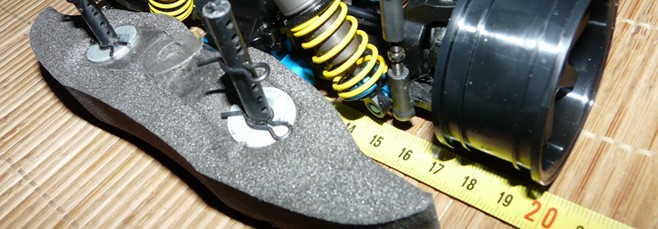
... and at the rear
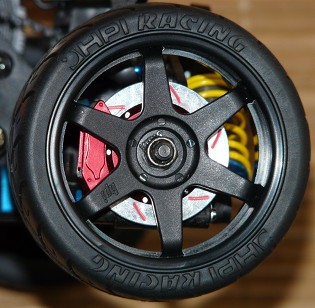
The result is undoubtedly realistic, especially if the rim has few thin spokes in order for the brake disc to remain visible. Nevertheless, you need to know the limits of this scale option:
- the rim requires a positive offset of at least 3mm otherwise the caliper will touch the rim spokes. This is a minimum offset that might need to be more important depending on the inner rim design.
- the upright should be in plastic to correctly hold the caliper. Any shape on the upright may also help but it can also prevent the caliper to be fitted correctly: unfortunately, that's what happened at the rear on my chassis. This is why I had to revert it since it should have been oriented towards the rear of the chassis.
- the upright inner ball bearing needs to have an exterior diameter of 10 or 11mm.
It's a shame these parameters restrict these realistic brake discs use on Tamiya's chassis, especially because of the required large offset rims and the upright inner bearing dimension. Also, these brake discs are so complicated to mount that once they are fitted, you'd better consider they are definitive. But when all conditions are there, the result is very nice.
