
")
Building the TA-02T chassis
The process is always the same: the chassis assembly on one side, and the body shell painting on the other. The body is in lexan and needs three different colors as I decided to make it "box art".
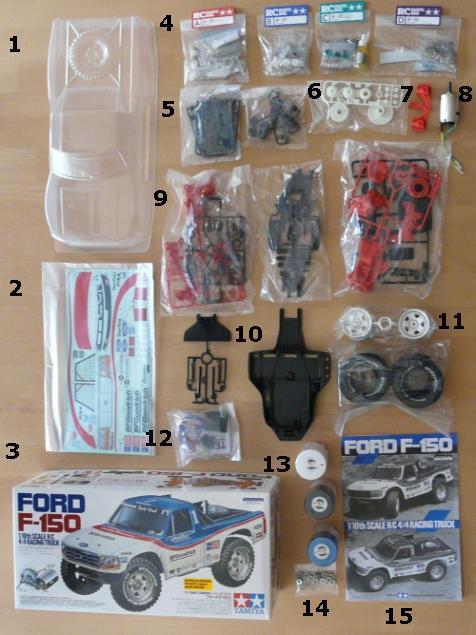
To begin with, here's the inventory of all pieces to be assembled. Apart from the TEU-101BK electronic speed controller that is included in the box, electronics are not shown on the photo (radio, battery pack and steering servo).
1. The lexan bodyshell.
2. The sticker sheet.
3. The box (very small and now empty).
4. Screw bags. The 3rd contains part of the dampers (the oil bottle is a clue  ).
).
5. Hydraulic damper bags.
6. Differential gears.
7. A pair of front uprights.
8. The Mabuchi 540 stock motor i will use as I will not hop up this model. A least for the moment.
9. Different parts. The mix between red and black plastic parts proves that there is a mix between two different chassis.
10. The front bumper with body mounts, and the bathtub chassis.
11. Rims and tires (to glue). The tire lettering is already done.
12. The TEU-101BK electronic speed controller.
13. Paint cans. From the top, the white (PS-1), the black (PS-5) and the metallic blue (PS-16).
14. Additional hop ups, 16 bearings (1150 type) plus 6 others (850 type) to replace all plastic metal bearings.
15. Last, the required assembly manual.
After this inventory, let's start the assembly.
The first steps are the front and rear gearboxes assembly. The rear one contains a ball differential: it's the first one I built and there's no problem as long as you exactly follow the manual instructions, especially the placement of the disk springs. Next is fixing the motor with an 17 tooth pinion, then inserting the assembled spur gear and other gears. You finish the gearbox assembly by fitting the uprights, suspension arms and drive shafts.
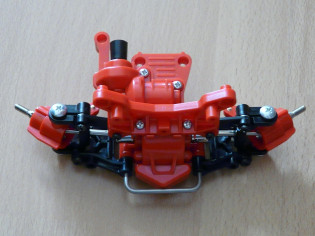
The front gearbox has a classical satellite-based differential. No problems either. You also finish the gearbox assembly by fitting the uprights, suspension arms and shafts. Last, you assemble the four hydraulic dampers and you mount them on the gearboxes.
Rear gearbox
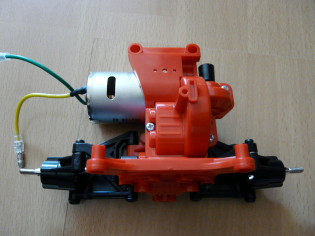
Front gearbox
Both gearboxes with dampers fitted
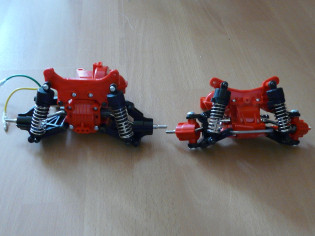
So far, all looks to be quite solid, but the color mix of red and black plastic parts is somewhat strange. And not very nice looking in my opinion.
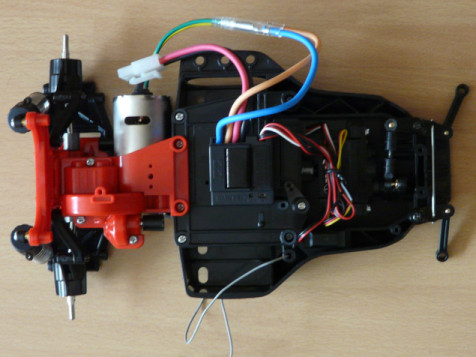
Next step is electronic placement and setup.
For radio, I need to use the Sanwa/Acoms variant for my steering servo. As I already noticed in previous assembly processes, the recommended screw by the manual instructions (a 3x10 mm) is a little bit too short to fix it well. So I had to replace it with a 3x12 screw coming from my spare parts junk. Apart from this easy to solve problem, everything goes absolutely fine.
Instead of sticking the receiver into the chassis, I placed it my way for the moment. I used a servo arm screwed into the chassis to maintain it. I will just have to unscrew it if I need to change the crystal.
The next step is to assemble front and rear gearboxes to the bath tub chassis and to insert the propeller shaft. No problem either, everything fit easily. Then you have to mount the tires onto the rims, glue them with cement glue and to fit them to the wheel axles.
Last step, cable tie wires far from the central propeller shaft. A good idea is to separate power wires (stick pack and motor) from radio wires (servo and antenna).
Chassis fully assembled and cable tied
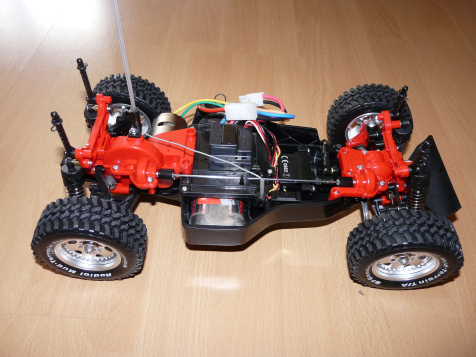
Two tips

Two little tips on the last photo: as per the manual, place an o-ring on top of the body clips. The body will lay on them and as they are soft, they will preserve the body paint. The second one is a bit of antenna pipe that make the antenna wire pass well above the propeller shaft.
The chassis assembly is now finished. A little drive into the apartment shows everything works great. But I noticed that the propeller shaft is noisy because of vibrations. I'll try to solve this later.
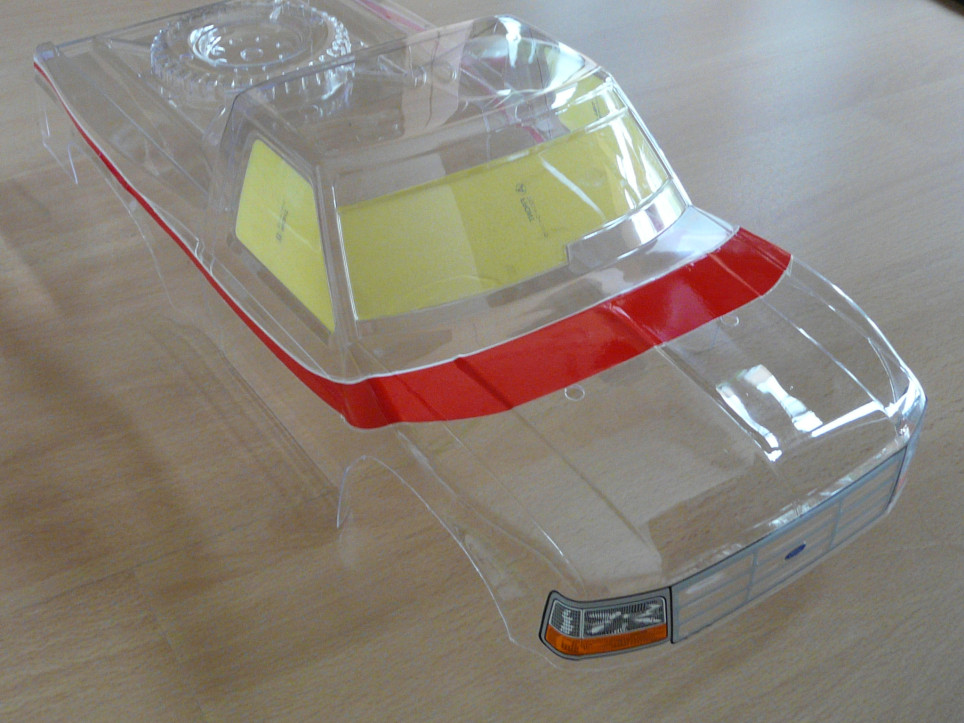
The Ford F150 bodyshell
A chassis is nothing without a nice bodyshell. This model's is in lexan and will receive three colors: black for the rear, metallic blue for the cockpit, and then white for the front and doors. Little reminder: colors needs to be painted in that precise order (from the darkest to the lightest).
This decoration requires a big masking job between the different colors, so I decided to cut the body before to apply paint. That was a mistake: see below. Windows masks are the only one provided with the kit: so I'll have to mark the limits between colors.
Unlike what should be done normally, the first set is to remove the outside protection film: too bad for the possible paint projections. Because even if you always paint a lexan body from the inside, projections can always occur on the outside (it's even a fact since you spray 25 to 30 cm away from the body.
That is when I realized afterwards that I had made a mistake when cutting the body shell first. As the outside protection film needs to be removed to apply the red stickers that make the limit between the metallic blue and the white color (to be marked with masking tape), spraying the white color becomes very difficult. The risk to have paint projections ont he outside of the body is very important as the white goes on the edge of the body. If you don't cut the body, there is a lot of lexan left plus the lexan borders that will protect the outside from the paint. Of course, masking the outside will be much easier with the uncut body (because you don't want paint projections on the outside of the body, especially on the red stickers).
So, the first step becomes: do not cut the body shell but do remove the outside protection film.
Second step is to apply stickers # 1, 2 and 3. Those are the front red band and the two red bands on the sides. You should start by the front one and carefully notice its position related to the windshield and by centering it with the help of the little white mark on the sticker. Yeah, I almost forgot: leave the little white marks on the red stickers when you cut them because they will help you to center them on the body. Next, you apply the side bands beginning from the front side of the body: the best is to let them naturally go (they are curved) and to adjust them precisely on their way to the rear of the body. Be carefully when arriving close the the rear wheel arches: the sticker has to go in straight line towards the rear and get exactly where it should above the rear lights. That's much easier to describe it than to to it, especially because the stickers are very thin and fragile: they can easily get cut when you remove them. So good luck!
The last sticker to place is the front grill (# 12). It will then help you mask this area to apply the grill black color background. This one is pretty easy to place, and the white mark will also be helpful to center it.
That's the moment to talk about stickers that can get torn. Sometimes, they are long and thin and to place them is quite difficult. So you may have to remove them to place them better. That's the moment these things choose to get torn. When it happens, try to make the cut as straight as possible, and keep on placing the sticker by putting the two pieces as close as possible. When you cut stickers from the decal sheet, you always have transparent pieces left. Just keep them. You can cut them to place them onto the cut stickers, exactly where these things always tend to curb because they don't stick well anymore. Depending on the sharpness of the cut and how careful you are to place the transparent "patch", the result can be so good that you can't even notice it.
Now, it is time to clean the inside of the body with detergent (the same you handwash your dishes with). You'd better do it to remove any remaining oil used to unmold the body when they make it. If you don't, you will have problems with the paint that won't stick well to the body. Be careful no to put water onto the stickers you already placed otherwise they will go. After cleaning, you dry the body and apply the window masks.
In short, the body should look like this before you start masking it to spray the black color. Well, it should almost look like this: remember, you did not cut the body yet...
So now, you need to protect all the body but the places where to spray the black paint: the rear side and the front grille.
If paint goes where it should not, wait for a dozen of hours before removing the masks. Otherwise, the paint will peel off. By the way, to remove a masking tape, the best is to peel it with an 45° angle when possible, otherwise an 90° angle. When done, it's time to repair the mistakes. There's no perfect method, but you can choose among 3 options:
- a Q-tip (or cotton bud) with wood alcohol to apply onto the paint to be removed (for friends across the Channel, a Q-tip is a cotton bud, and wood alcohol is methylated spirits). This only works as long as the paint is not totally dry. You can also use a sharp cutter knife blade to streak the paint to be removed: but be careful not to touch the lexan (just pass the blade smoothly onto the paint). This cuts the dry coat and lets the alcohol reach the underlying fresh paint to dissolve it.
- break liquid (DOT3) on a Q-tip. This works even if the paint is dry. It seems that the liquid used in Citroën hydraulic suspension works even better. I never tried it (and Citroën cars may not be available in your country).
- sanding with a very thin sandpaper (over 1200) when the paint is dry (over 24 hours after spraying). Then use polish. I never tried this method either.
Anyway, you'll have to repeat the body cleaning step to remove any product you applied to remove extra paint. Otherwise the next coat will not stick to the body.
After spraying the black color, spray the metallic blue. A new masking step is required to protect the area to be painted in white. Do not mask the already black painted areas because the blue will not alter the darker black color. Do not forget to mask the body mounts and antenna holes.
After drying, let's spray the white paint. Just remove all the masks, but leave the windows masks and the body mounts and antenna holes masks. Those have to be masked from the outside of the body, being careful with the red stickers (otherwise, you will tear the red sticker when removing the hole masks).
Do not mask the metallic blue areas to spray the white. The blue paint needs to be covered by the white coats: it will get a lighter shade that will reinforce the "metallic" effect. After spraying the white, let it dry and then remove all the masks.
The paint process is now done (at last!). Normally, if you follow the steps, it's time to cut the body. For me, I had already cut it and it was a big mistake. Cutting an painted body requires more care: avoid to twist the lexan. It is quite simple to do it, except for wheel arches. A good way to do it is to use a cutter knife blade to draw the line where to cut (from the outside of the body). Then twist gently the lexan part to be removed. It should break right where you drew the line.
Finishing the body means applying the stickers. The decal sheet only provides what's needed: if you thought you would hide paint mistakes with stickers, it is a good idea to pray that they are right where a sticker goes. Especially because the decoration are mainly sponsors and that you can't really add more sponsors unless you want to make your truck look like a moving ad sign (which is partly what it is already).
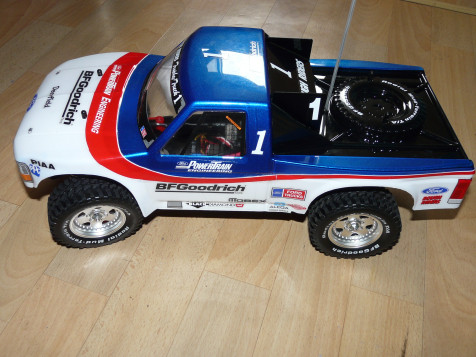
Now the body is finished, you can fit it onto the chassis. Great moment! Overall, the truck is pretty and realistic. That's my result after hours of pain:
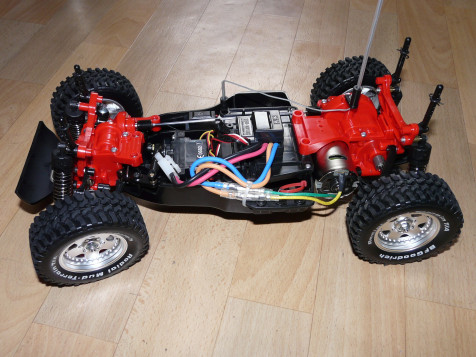
The chassis is ready to go
With the bodyshell on
As a conclusion, this body decoration takes much longer than the chassis assembly. It is also quite difficult and far from beginner's skills, either for applying stickers or for applying masks to spray the different colors. In other words, making that body is a hell of a job! During the time I spent working on this body, I could not stop wondering why Tamiya did not made this step easier. A very handful way would have been to provide a "peel off" system. This technique is basically made of several coats of protecting film. For this F-150 body, you would have a first coat for the windows masks, a second coat for the white color, and the last for the blue. So you could directly spray the black color, remove a coat to spray the blue, remove another coat and spray the white, and then remove the windows masks. With a four layer system, you could even directly spray the spare rim molded at the rear of the truck (I will paint mine later from the outside of the body using a paint brush).
But this is a dream: I don't even know of any RC maker who features this kind of system. Anyway, and especially for this body, a better system would be warmly welcomed.
Well, after hours spent on it, I'm happy with the final result. With some distance, the decoration is fine despite the few stickers do not hide all paint mistakes.
