
")
Super Short M-02: fitting an antenna tube
Now let's work on this: in the original model manual, Tamiya recommends two different ways to fix an antenna tube, but I like none of them:
- by drilling a hole into the rooftop (1) and damaging the bodyshell
- by not mounting the window pane on the driver side (2) which makes the body looks incomplete
So I thought about alternative ways to fix the antenna tube:
- using the front wings holes (3)
- drilling the rear window pane (4): this a solution used on many modern models, but I don't like this one either
- drilling into one of the rear grills (5)
- alternative method number 6 which is not shown on the photo below because the antenna tube fits onto the chassis

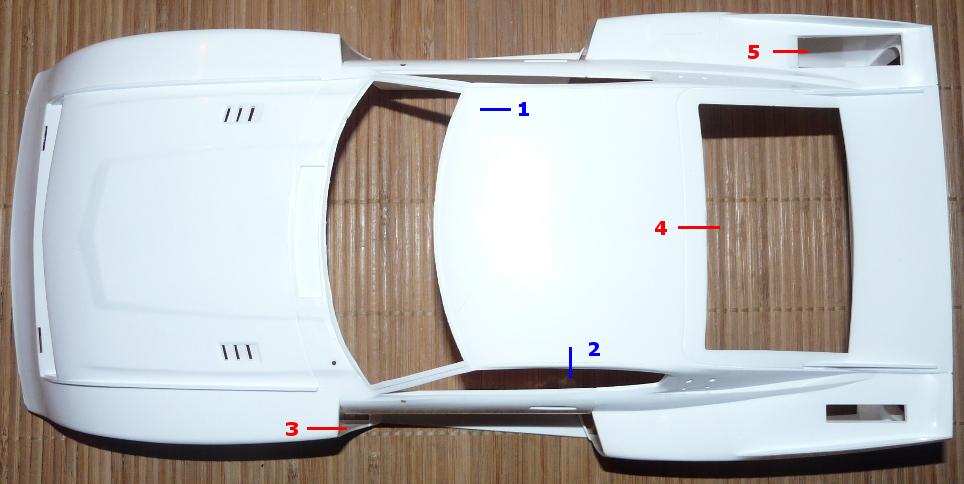
Since I chose not to drill the bodyshell, I won't drill the rear window pane and won't leave the pilot side window pane apart either. Alternatives 1, 2 and 4 are not good for me. Let's try alternatives 3 and 5 that I quickly tested to see how they look:
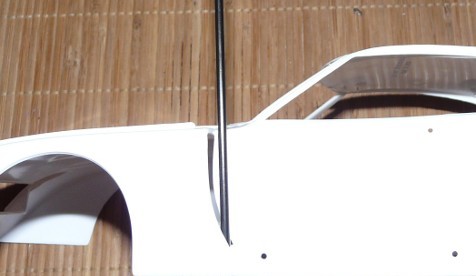
Using the front left wing hole
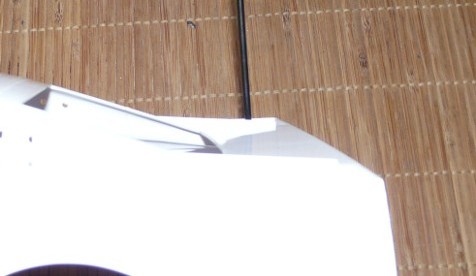
Using the rear right grill
Using the front wing hole looks weird to me. Using the rear grill looks much better and tends to remind how it looks on my XR311. But this idea led me to another that I definitely prefer: this is alternative number 6.
This idea is to place the antenna tube at the rear, outside the overall bodyshell. To do this, I used the chassis itself, and more specifically the rear bumper that is only good enough for better enclosing the rear gearbox housing since it is way too short to prevent any shock from the rear.
Antenna post

Close up on the antenna tube notch
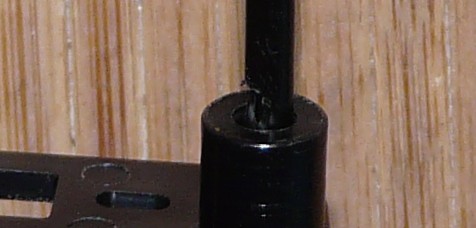
This is easy to make: just drill a hole on the right side of the rear bumper, use a flat head screw that you insert from below and just add a blocking nut to hold the part. For the arm, I just found an E1 part from a TA-01 chassis I had in my spare stock (this part the antenna post mount on the standard TA-01 chassis). You can use other parts if you want, the main point being you need 40mm from the rear bumper end. You should not insert the antenna wire from below that part since it could hit the ground when running the car and cut the antenna wire. This is the reason why I made a notch at the antenna tube bottom to insert the antenna wire and keep it safe.
Super Short M-02: TamTech wheels
The bodyset is 1/12th scale and not 1/10th like current productions: the wheels need to comply with the original scale. As I said before, the original wheel set can't be used, at least not at the rear since the original traction architecture doesn't use hexagons. These first appeared with dents in 1986 on the 58059 Porsche 959 kit, and later in 1990 on the 58087 Manta Ray kit with the usual shape as we have them nowadays.
In the current production line-up, Tamtech GT-01 chassis wheels are 1/12th scale: with some modification and the use of special hexagons, they can fit an M-02 chassis.
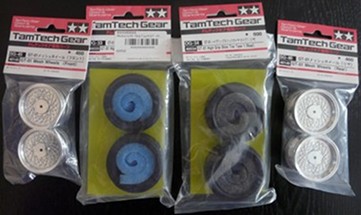
Diplo tire set 'Front-A' w/ wheel (SP-5075)
Sponge tire set 'Rear-B' w/ wheel (SP-5057)
Tamtech 40145 / 40533 et 40534 / 40146
Checking dimensions:
- The original Celica front tires feature a 50mm diameter and are 24mm wide: Tamtechs are respectively 54mm and 20mm.
- At the rear, original diameter is 60mm and width is 30mm: Tamtechs are respectively 54mm and 25mm.

The Tamtech wheel set is an hop-up version for the two Porsche 934 Turbo RSR models (Vaillant and Jagermeister liveries): the standard wheelset has golden rim branches whereas the hop-up version is fully chromed. On the original Celica kit, rims are colored flat grey, but the rear wing being chromed (as well as other decoration parts on the body), I decided to leave the rims fully chromed.
The Tamtech rims diameter is somewhat much bigger than the Celica originals: on the original Celica model, rear tires are very thick whereas the Tamtech have a very low-profile shape. In order to make the rear tires look thicker, I just painted the external rim sides in flat black
But mounting Tamtech rims on an M-chassis is no direct fit: you need to make some adaptations:
- re-drill the rims axis with a 4mm hole so they can mount on the M-chassis axles (as they are bigger than the Tamtech's). This is easy to do.
- the Tamtech hexagons are smaller than M-chassis standard.
The big problem is that such wheel adapters do not exist... well, they do...
The Tamtech wheel system and M-chassis hexagons
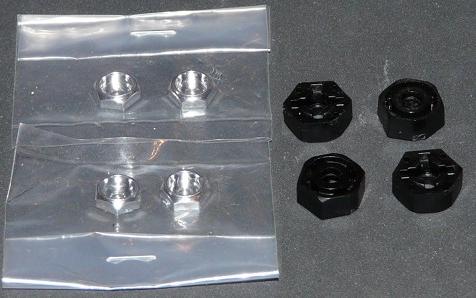
Adapters made by MAKi aka maquettedecox
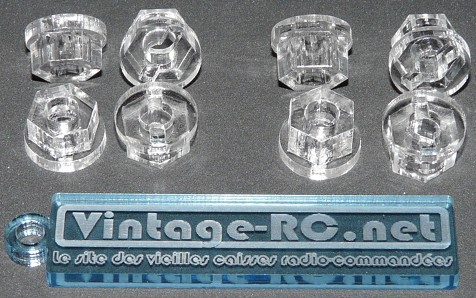
These adapters were designed by MAKi aka maquettedecox, a member of the Vintage-RC forum, (this explains the special gift he sent me). Technically, these are a two-piece system: a 10mm hexagon glued on a 12mm round part (which is an M-chassis hexagon size). The round part is drilled in order to leave room for the wheel axle pin.
Next: an M-02 wheel width is 152mm but here we need a 170mm width in order for the wheels to get as close as possible from the body arch wheel. The difference is mainly due to the tire width (30mm on the original Celica versus 25mm on the Tamtech). So we need to "fill" the 18mm difference at the rear of the chassis.
So, I used longer wheel axles because you can't offset rims by 9mm on each side and keep the M-02 wheel axles. In my spare part stock, I found wheel axles for my King Blackfoot: they are 44mm long (M-02 are 35mm). Obviously, a Tamtech rim is not wide like a Monster Truck's: some adaptation is required.
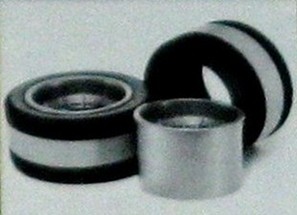
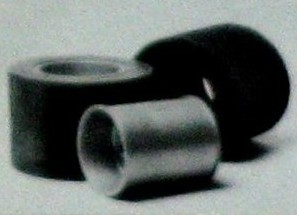
What you need for one wheel
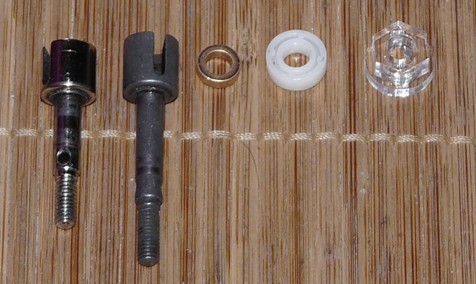
Final result
Here's the list of the parts you need:
- Super Blackfoot or King Blackfoot rear wheel axle (reference 9805391 for the set of 2)
- two 850 metal bearings (a ball bearing is useless here)
- two 1150 plastic bearing (or better, 1150 ball bearings: the plastic ones will be replaced)
- and of course, MAKi's special adapters
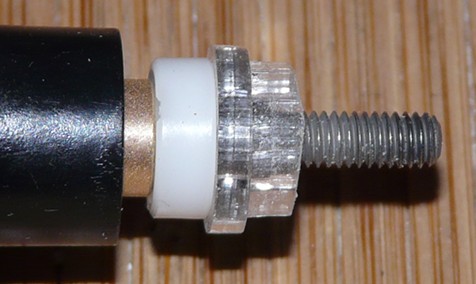
Assemble everything as per the second photo: the most important is to fit the 850 metal bearing between the upright 1150 ball bearing and the plastic one shown on the photo. The plastic one will then receive the little wheel pin and MAKi's adapter. Mixing the order of the parts will firmly block the wheel. Now fit the wheel and screw the wheel nut. The rear wheel width is now 170mm long and the wheels are located right next to the body wheel arches..
To be honest, I would never have gone into this project without MAKi's solution that lets you use the 1/12th scale Tamtech rims on an M-Chassis. Only considering the wheels dimensions, it is possible to use M-chassis rims with 55D tires at the front and 60D tires at the rear. But as far as I searched, I couldn't find any nice looking rim for this project. Moreover MAKi can provide different offsets for his adapters: mine have 6mm and 8mm offsets. But I made a little mistake when ordering: 7mm offset is perfect at the front, but tires hit the bodyshell arches at the rear. Reducing the offset to 5mm at the rear is the correct dimension. The 8mm offset adapters are not used... for the moment.
